Using the Arduino IDE, this guide shows how to get the MAC address of ESP32/ESP8266 boards. We also show you how to change the MAC address of your board.
What’s a MAC Address?
A MAC Address, which stands for Media Access Control Address, is a hardware unique identifier that identifies each network device.
MAC Addresses are made up of six groups of two hexadecimal digits separated by colons, for example, 30:AE:A4:07:0D:64.
MAC addresses are assigned by manufacturers; however, you may also assign a custom MAC address to your board. However, each time the board is reset, it returns to its original MAC Address. So, in every sketch, you need to add the code to set a custom MAC Address.
Get ESP32 or ESP8266 MAC Address
Simply upload the following code to the ESP32 or ESP8266 to get your board's MAC Address; the code is compatible with both boards.
// Complete Instructions to Get and Change ESP MAC Address: https://RandomNerdTutorials.com/get-change-esp32-esp8266-mac-address-arduino/

#ifdef ESP32
  #include <WiFi.h>
#else
  #include <ESP8266WiFi.h>
#endif

void setup(){
  Serial.begin(115200);
  Serial.println();
  Serial.print("ESP Board MAC Address:  ");
  Serial.println(WiFi.macAddress());
}

void loop(){

}
Demonstration
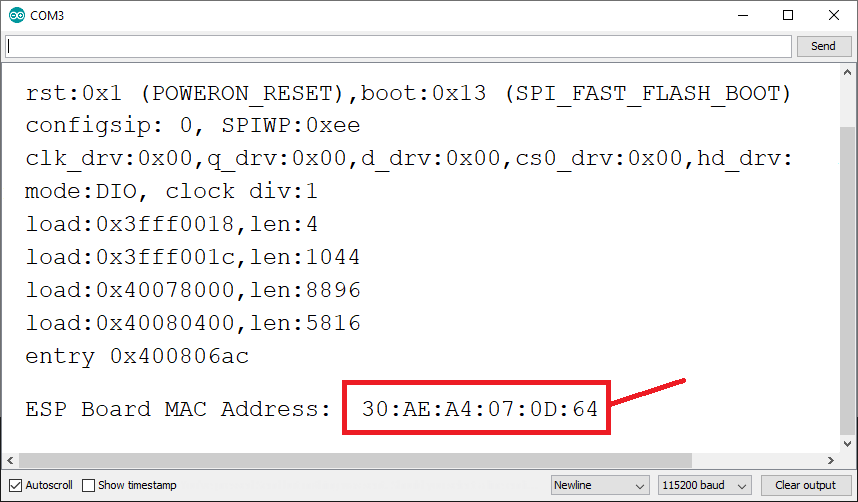
After uploading the code, open the Serial Monitor at a 115200 baud rate. Press the RESET or EN button on the board.
As shown in the following figure, the MAC Address should be printed on the Serial Monitor.
That's all! You now know how to get the MAC Address of ESP32/ESP8266 board.
Set a Custom MAC Address for ESP32 and ESP8266
Giving your boards a custom MAC Address may be useful in various situations. However, as previously indicated, this does not overwrite the MAC Address set by the manufacturer. As a result, every time you reset the board or upload a new code, it returns to its default MAC Address.
Change ESP32 MAC Address (Arduino IDE)
The following code sets a custom MAC Address for the ESP32 board.
// Complete Instructions: https://RandomNerdTutorials.com/get-change-esp32-esp8266-mac-address-arduino/

#include <WiFi.h>
#include <esp_wifi.h>

// Set your new MAC Address
uint8_t newMACAddress[] = {0x32, 0xAE, 0xA4, 0x07, 0x0D, 0x66};

void setup(){
  Serial.begin(115200);
  Serial.println();

  WiFi.mode(WIFI_STA);

  Serial.print("[OLD] ESP32 Board MAC Address:  ");
  Serial.println(WiFi.macAddress());

  // ESP32 Board add-on before version < 1.0.5
  //esp_wifi_set_mac(ESP_IF_WIFI_STA, &newMACAddress[0]);

  // ESP32 Board add-on after version > 1.0.5
  esp_wifi_set_mac(WIFI_IF_STA, &newMACAddress[0]);

  Serial.print("[NEW] ESP32 Board MAC Address:  ");
  Serial.println(WiFi.macAddress());
}

void loop(){

}
You can set a custom MAC Address in the following line:
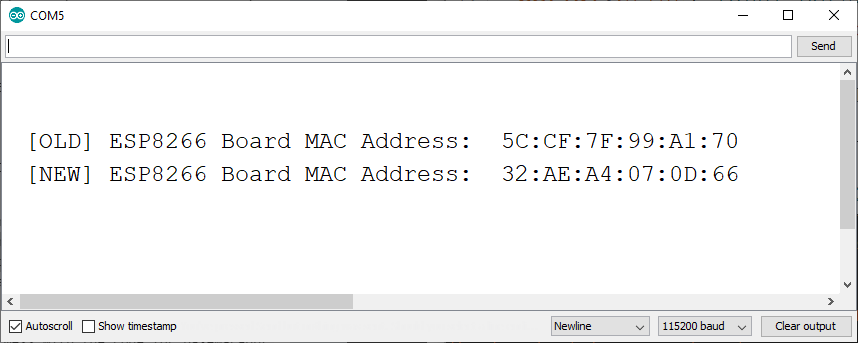
uint8_t newMACAddress[] = {0x32, 0xAE, 0xA4, 0x07, 0x0D, 0x66};After uploading the code, open the Serial Monitor at a 115200 baud rate. When you restart the ESP32, you should see its old and new MAC addresses.

Change ESP8266 MAC Address (Arduino IDE)
The following code sets a custom MAC Address for the ESP8266 board.
// Complete Instructions: https://RandomNerdTutorials.com/get-change-esp32-esp8266-mac-address-arduino/

#include <ESP8266WiFi.h>

// Set your new MAC Address
uint8_t newMACAddress[] = {0x32, 0xAE, 0xA4, 0x07, 0x0D, 0x66};

void setup(){
  Serial.begin(115200);
  Serial.println();

  WiFi.mode(WIFI_STA);

  Serial.print("[OLD] ESP8266 Board MAC Address:  ");
  Serial.println(WiFi.macAddress());

  // For Soft Access Point (AP) Mode
  //wifi_set_macaddr(SOFTAP_IF, &newMACAddress[0]);
  // For Station Mode
  wifi_set_macaddr(STATION_IF, &newMACAddress[0]);

  Serial.print("[NEW] ESP8266 Board MAC Address:  ");
  Serial.println(WiFi.macAddress());
}

void loop(){

}
Set your custom MAC Address on the following line:
uint8_t newMACAddress[] = {0x32, 0xAE, 0xA4, 0x07, 0x0D, 0x66};After uploading the code, open the Serial Monitor at a 115200 baud rate. When you restart the ESP8266, you should see its old and new MAC addresses.
Conclusion
We've shown you how to get your ESP32 and ESP8266 manufacturer MAC address using the Arduino IDE in this quick guide. You've also learned how to set a custom MAC Address for your boards.
If you like ESP8266, you may also like:
- ESP8266 NodeMCU Static/Fixed IP Address – Working & Testing
- ESP8266 NodeMCU Web Server using SPIFFS (Beginner Guide)
- Send Email from ESP8266 NodeMCU via SMTP Server
- Door Status Monitor using ESP8266 with Email Notifications
We hope you find this tutorial useful. Thanks for reading.


![Official Arduino Starter Kit [K000007] (English Projects Book) - 12 DIY Projects with All Necessary Electronic Components and Instructions - origianl kit by Arduino from Italy](https://m.media-amazon.com/images/I/51fPv6DsjQL.jpg)


