Build a door status monitor using ESP32 and a magnetic reed switch. You'll receive a Telegram Notification whenever the door changes state
Using an ESP32 board and a magnetic reed switch, you will use this project to monitor the status of a door. Every time the door changes state—open or closed—a message will be sent to your Telegram account. You will always be notified, wherever you are if your smartphone has internet connectivity. It will be possible to program the ESP32 board using the Arduino IDE.
A similar tutorial that sends emails instead of Telegram messages is available here:
Project Overview
In this project, we will create a Telegram Bot that will send messages to your Telegram account whenever the state of a door changes. We'll use a magnetic contact switch to detect the change.
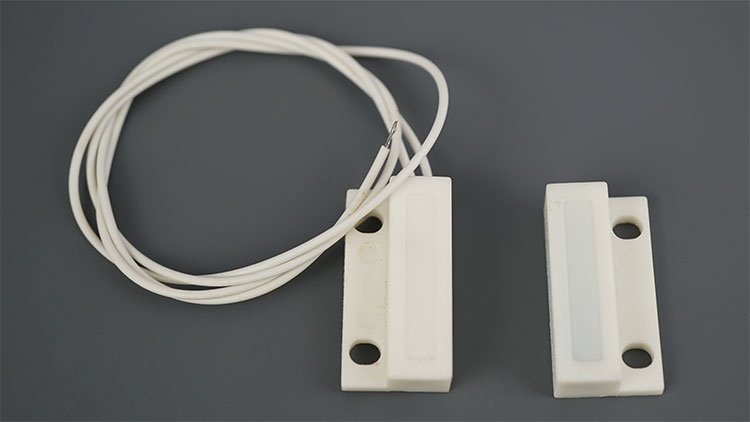
A magnetic contact switch is essentially a reed switch encased in a plastic shell so that it can be easily applied to a door, window, or drawer to detect whether it is open or closed.
When a magnet is near the switch, the door is closed—the electrical circuit is closed. When the door is open and the magnet is far from the switch, the circuit is open. See the figure below.
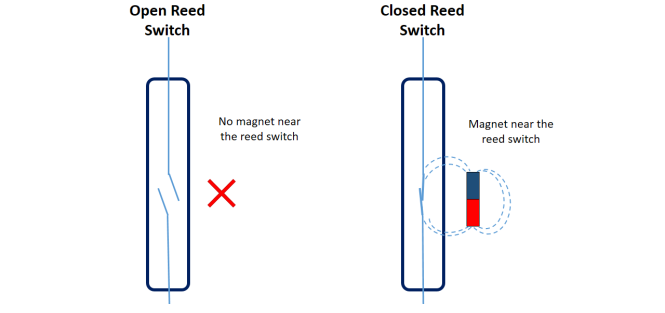
To detect changes in its state, we may connect the Reed switch to an ESP32 GPIO.
Introducing Telegram
Telegram Messenger is a voice-over-IP and cloud-based instant messaging service. You can easily install it on your smartphone (Android and iPhone) or computer (PC, Mac, and Linux). It is completely free and ad-free. Telegram enables you to create bots with which you may interact.

“Bots are third-party apps that run inside Telegram. Sending messages, instructions, and inline requests allows users to interact with bots. Using HTTPS requests to the Telegram Bot API, you command your bots.”
To send messages to your Telegram account, the ESP32 will interact with the Telegram bot. You will receive a notification on your smartphone whenever the door changes state (as long as you have an internet connection).
Creating a Telegram Bot
Go to Google Play or the App Store, download, and install Telegram.
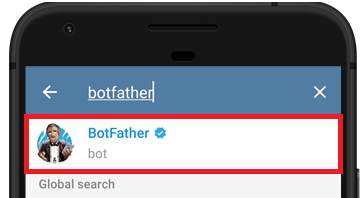
To create a Telegram Bot, open Telegram and follow the next steps. First, search for “botfather“, and then click the BotFather as shown below. Alternatively, open t.me/botfather on your smartphone.
You should be prompted to click the “start” button when the following window opens.
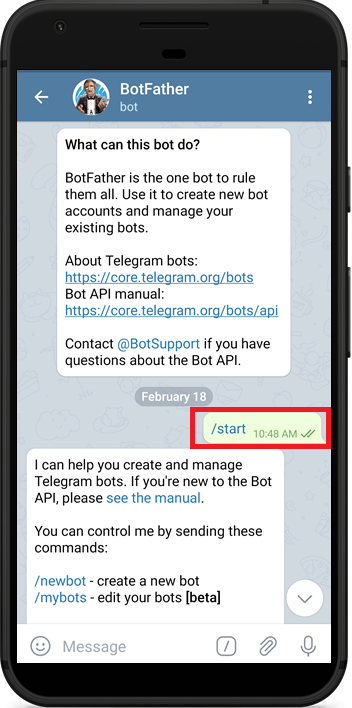
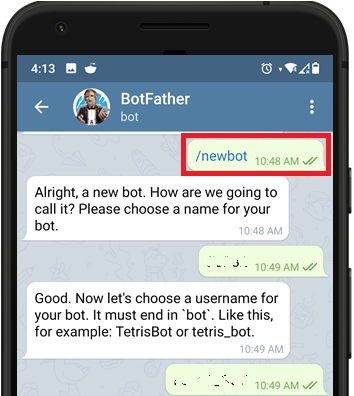
To create your bot, type /newbot and then follow the instructions. It should have a name and a username. Door Sensor is name of mine, and ESPDoorSensorBot is the username.
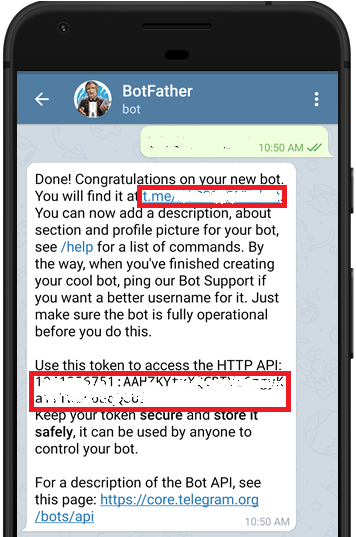
You will receive a message with a link to view the bot and the bot token if your bot was successfully created. For the ESP32 to interact with the bot, you will need to save the bot token.
Sending a Message to the Bot
Before your Telegram Bot can send you messages, you must first send it a message from inside your Telegram account.
1) Go back to the chats tab, and in the search field, type the username of your bot.
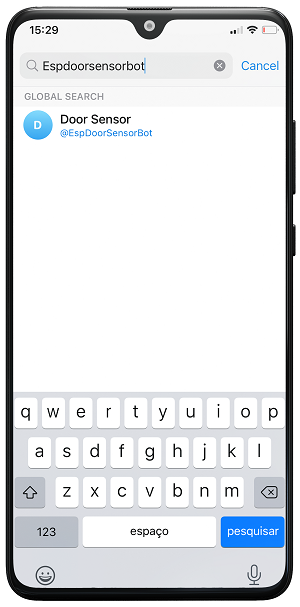
2) Select your bot to start a conversation.
3) Click on the Start link.
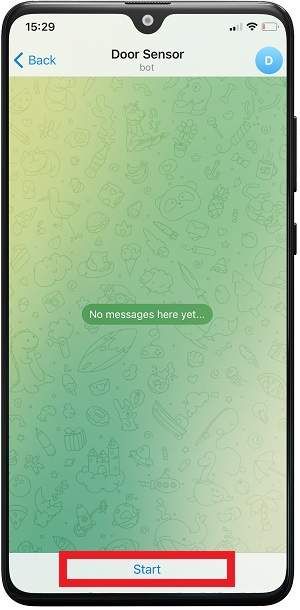
And that’s it! You can proceed to the next section.
Get Your Telegram User ID
The bot needs to know your user ID to send a message to your Telegram account.
In your Telegram account, search for “myidbot” or open this link: t.me/myidbot on your smartphone.
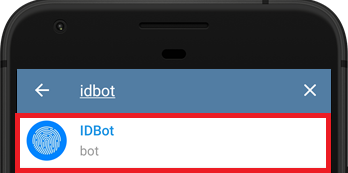
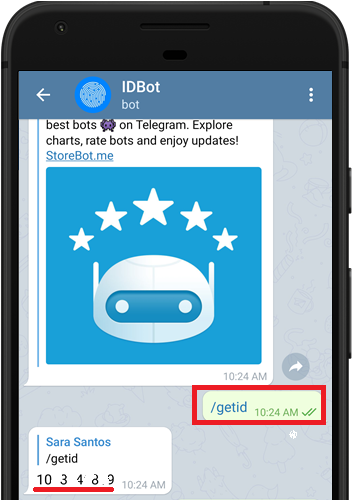
Type /getid to initiate a conversation with that bot. Your user ID will be included in the reply you get. You'll need that user ID later on in this tutorial, so save it.
Preparing Arduino IDE
Make sure you have the ESP32 board installed in your Arduino IDE since we'll be using it to program the board.
- Install ESP32 Board in Arduino IDE in less than 1 minute
- How to Install ESP32 Boards in Arduino IDE 2.0
Universal Telegram Bot Library
The Universal Telegram Bot Library, created by Brian Lough, offers an easy interface for the Telegram Bot API, and we'll use it to interact with the Telegram bot.
Follow the next steps to install the latest release of the library.
- Click here to download the Universal Arduino Telegram Bot library.
- Go to Sketch > Include Library > Add.ZIP Library...
- Add the library you’ve just downloaded.
Important: Installing the library using the Arduino Library Manager may result in the installation of a deprecated version.
For all the details about the library, take a look at the Universal Arduino Telegram Bot Library GitHub page.
ArduinoJson Library
You also have to install the ArduinoJson library. Follow the next steps to install the library.
- Go to Sketch> Include Library > Manage Libraries.
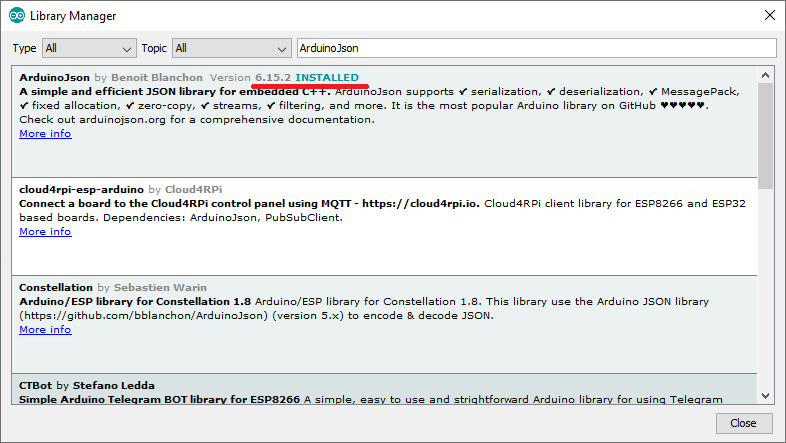
- Search for “ArduinoJson”.
- Install the library.
We’re using ArduinoJson library version 6.5.12.
Parts List
You will need the following items to proceed with this project:
You can use the preceding links to find all the parts for your projects at the best price!
Schematic – ESP32 with Reed Switch
We wired the reed switch to GPIO 4, but you can connect it to any suitable GPIO.
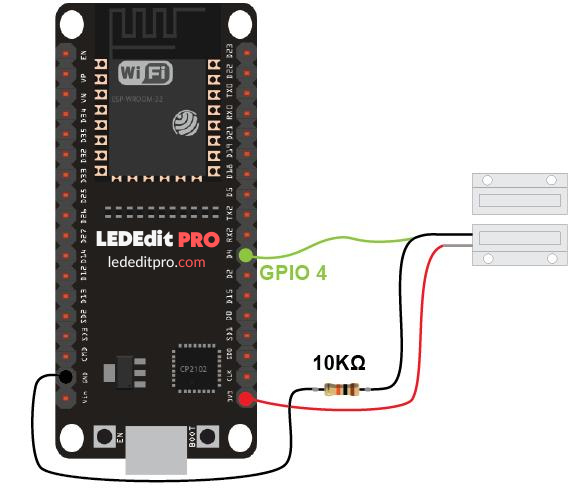
Copy and paste the sketch below into your Arduino IDE. Replace your credentials with the SSID, password, BOT token, and user ID.
/*
  LEDEdit PRO
  Complete project details at https://lededitpro.com/door-status-monitor-using-esp32-with-telegram-notifications

  Permission is hereby granted, free of charge, to any person obtaining a copy
  of this software and associated documentation files.

  The above copyright notice and this permission notice shall be included in all
  copies or substantial portions of the Software.
*/

#include <WiFi.h>
#include <WiFiClientSecure.h>
#include <UniversalTelegramBot.h>
#include <ArduinoJson.h>

// Set GPIOs for LED and reedswitch
const int reedSwitch = 4;
const int led = 2; //optional

// Detects whenever the door changed state
bool changeState = false;

// Holds reedswitch state (1=opened, 0=close)
bool state;
String doorState;

// Auxiliary variables (it will only detect changes that are 1500 milliseconds apart)
unsigned long previousMillis = 0;
const long interval = 1500;

const char* ssid = "REPLACE_WITH_YOUR_SSID";
const char* password = "REPLACE_WITH_YOUR_PASSWORD";

// Initialize Telegram BOT
#define BOTtoken "XXXXXXXXXX:XXXXXXXXXXXXXXXXXXXXXXXXXXXXXXXXXXX"  // your Bot Token (Get from Botfather)

// Use @myidbot to find out the chat ID of an individual or a group
// Also note that you need to click "start" on a bot before it can
// message you
#define CHAT_ID "XXXXXXXXXX"

WiFiClientSecure client;
UniversalTelegramBot bot(BOTtoken, client);

// Runs whenever the reedswitch changes state
ICACHE_RAM_ATTR void changeDoorStatus() {
  Serial.println("State changed");
  changeState = true;
}

void setup() {
  // Serial port for debugging purposes
  Serial.begin(115200);

  // Read the current door state
  pinMode(reedSwitch, INPUT_PULLUP);
  state = digitalRead(reedSwitch);

  // Set LED state to match door state
  pinMode(led, OUTPUT);
  digitalWrite(led, !state);

  // Set the reedswitch pin as interrupt, assign interrupt function and set CHANGE mode
  attachInterrupt(digitalPinToInterrupt(reedSwitch), changeDoorStatus, CHANGE);

  // Connect to Wi-Fi
  WiFi.mode(WIFI_STA);
  WiFi.begin(ssid, password);
  client.setCACert(TELEGRAM_CERTIFICATE_ROOT); // Add root certificate for api.telegram.org
  while (WiFi.status() != WL_CONNECTED) {
    delay(500);
    Serial.print(".");
  }
  Serial.println("");
  Serial.println("WiFi connected");

  bot.sendMessage(CHAT_ID, "Bot started up", "");
}

void loop() {
  if (changeState){
    unsigned long currentMillis = millis();
    if(currentMillis - previousMillis >= interval) {
      previousMillis = currentMillis;
      // If a state has occured, invert the current door state
        state = !state;
        if(state) {
          doorState = "closed";
        }
        else{
          doorState = "open";
        }
        digitalWrite(led, !state);
        changeState = false;
        Serial.println(state);
        Serial.println(doorState);

        //Send notification
        bot.sendMessage(CHAT_ID, "The door is " + doorState, "");
    }
  }
}
How the Code Works
Continue reading to learn how the code works, or proceed to the Demonstration section.
First, include the required libraries.
#include <WiFi.h>
#include <WiFiClientSecure.h>
#include <UniversalTelegramBot.h>
#include <ArduinoJson.h>
Set the GPIOs for the reed switch and LED (the on-board LED is GPIO 2). We’ll light up the on-board LED when the door is open.
const int reedSwitch = 4;
const int led = 2; //optional
The changeState boolean variable indicates whether the door has changed state.
bool changeState = false;The state variable will hold the reed switch state, and the doorState, as the name suggests, will hold the door state—closed or opened.
bool state;
String doorState;
The following timer variables allow us to debounce the switch. The only changes that will be taken into account are those that have occurred with at least 1500 milliseconds between them.
unsigned long previousMillis = 0;
const long interval = 1500;
Insert your SSID and password in the following variables so that the ESP32 can connect to the internet.
const char* ssid = "REPLACE_WITH_YOUR_SSID";
const char* password = "REPLACE_WITH_YOUR_PASSWORD";
Insert your Telegram Bot Token—the one you’ve gotten in this step.
#define BOTtoken "XXXXXXXXXX:XXXXXXXXXXXXXXXXXXXXXXXXXXXXXXXXXXX"Insert your chat ID—the one you’ve gotten in this step.
#define CHAT_ID "XXXXXXXXXX"Create a new Wi-Fi client with WiFiClientSecure.
WiFiClientSecure client;Create a bot with the token and client defined earlier.
UniversalTelegramBot bot(BOTtoken, client);The changeDoorStatus() function will run whenever a change is detected in the door state. This function simply changes the changeState variable to true. Then, in the loop(), we’ll handle what happens when the state changes (invert the previous door state and send a message to your Telegram account).
ICACHE_RAM_ATTR void changeDoorStatus() {
  Serial.println("State changed");
  changeState = true;
}
setup()
In the setup(), initialize the Serial Monitor for debugging purposes:
Serial.begin(115200);Set the reed switch as an INPUT. And save the current state when the ESP32 first starts.
pinMode(reedSwitch, INPUT_PULLUP);
state = digitalRead(reedSwitch);
Set the LED as an OUTPUT and set its state to match the reed switch state (circuit closed and LED off; circuit opened and LED on).
pinMode(led, OUTPUT);
digitalWrite(led, !state);
Setting an interrupt
Set the reed switch as an interrupt.
attachInterrupt(digitalPinToInterrupt(reedSwitch), changeDoorStatus, CHANGE);The attachInterrupt() function in the Arduino IDE is used to set an interrupt. It takes three arguments: mode, the name of the function to be run, and the GPIO interrupt pin.
A GPIO interrupt is used as the first argument. To set the actual GPIO as an interrupt pin, use digitalPinToInterrupt(GPIO).
The interrupt service routine (ISR), which will be invoked each time the interrupt is triggered, is named the second argument to the attachInterrupt() function. It is the changeDoorStatus function in this instance.
In order for the processor to swiftly return to the main program's execution, the ISR function should be as simple as feasible.
The mode is the third argument. When the pin changes values, such as from HIGH to LOW and LOW to HIGH, we set it to CHANGE, which will cause the interrupt to be triggered.
To learn more about interrupts with the ESP32, read the following tutorial:
Initialize Wi-Fi
The ESP32 is connected to Wi-Fi in the following lines, and a root certificate for api.telegram.org is also added.
WiFi.mode(WIFI_STA);
WiFi.begin(ssid, password);
client.setCACert(TELEGRAM_CERTIFICATE_ROOT); // Add root certificate for api.telegram.org
while (WiFi.status() != WL_CONNECTED) {
  delay(500);
  Serial.print(".");
}
Serial.println("");
Serial.println("WiFi connected");
Send a message to your Telegram account informing you that the bot started.
bot.sendMessage(CHAT_ID, "Bot started up", "");loop()
In the loop(), we’ll read the changeState variable, and if a change has occurred, we’ll send a message to your Telegram account.
First, check if a change occurred:
if (changeState){Then, check if at least 1500 milliseconds have passed since the last state change.
if(currentMillis - previousMillis >= interval) {If that’s true, reset the timer and invert the current switch state:
state = !state;If the reed switch state is 1(true), the door is closed. So, we change the doorState variable to closed.
if(state) {
  doorState = "closed";
}
If it’s 0(false), the door is opened.
else{
  doorState = "open";
}
Set the LED state accordingly and print the door state in the Serial Monitor.
digitalWrite(led, !state);
changeState = false;
Serial.println(state);
Serial.println(doorState);
Finally, the following line sends a notification to your Telegram account with the current door state.
bot.sendMessage(CHAT_ID, "The door is " + doorState, "");Demonstration
Upload the sketch to your ESP32 after modifying it to include your network credentials, bot token, and user ID. Select your ESP32 board from the Tools > Board menu. After that, select the COM port the ESP32 is attached to under Tools > Port.
Open the Serial Monitor at a baud rate of 115200 to check if the changes are detected.
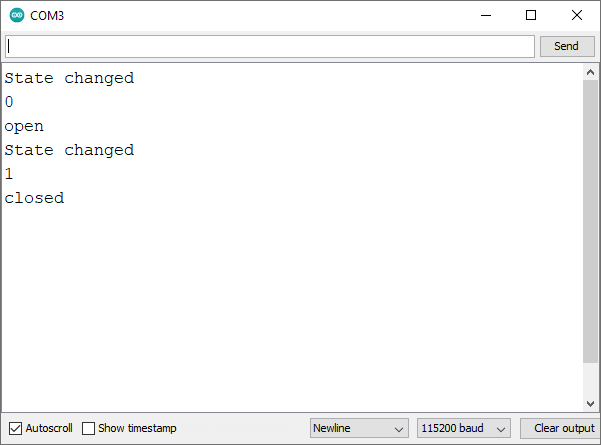
For prototyping/testing, you can apply the magnetic reed switch to your door using Velcro.

You now receive a message in your Telegram account when someone opens or closes your door.
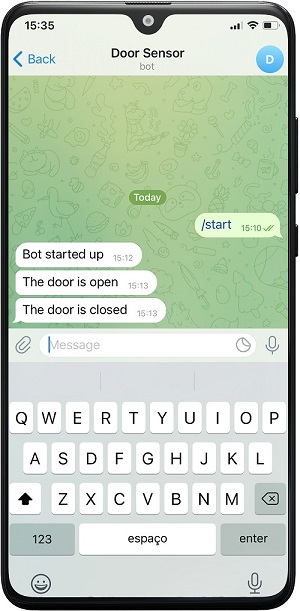
Conclusion
You now know that the door status monitor using ESP32 board and a magnetic reed switch. To determine if a door, window, or drawer has been opened or closed, this might be useful.
If you like ESP32, you may also like:
- Send Email from ESP32 via SMTP Server (Arduino IDE)
- ESP32 with WiFiMulti: Connect to the Strongest Wi-Fi Network
- How to Control Servo Motor with ESP32 and Arduino IDE
- ESP32 Web Server using SPI Flash File System (SPIFFS)
We hope you find this tutorial useful. Thanks for reading.


![Arduino UNO R4 WiFi [ABX00087] - Renesas RA4M1 / ESP32-S3 - Wi-Fi, Bluetooth, USB-C, CAN, DAC, OP AMP, Qwiic Connector, 12x8 LED Matrix](https://m.media-amazon.com/images/I/416S910MpBL.jpg)


![Official Arduino Starter Kit [K000007] (English Projects Book) - 12 DIY Projects with All Necessary Electronic Components and Instructions - origianl kit by Arduino from Italy](https://m.media-amazon.com/images/I/51fPv6DsjQL.jpg)



Awesome projects Keep up the good work.
May you please do the same project but include a relay to operate gate opening and closing? This feature will complete this project. Thank you.