You must use a Raspberry Pi 4 or newer to obtain the best experience while running Google Stadia.
Even though the Raspberry Pi has evolved into a more powerful machine over time, it is still unable to run modern games.
You will need to use services like Steam Link, Parsec, or NVIDIA Gamestream to run modern games on your Raspberry Pi.
Both of these options, however, require you to have access to a computer capable of running the games you choose. This is when a service like Stadia comes in handy.
Stadia is a Google-developed and operated cloud gaming service. You can stream games to any supported device, including the Raspberry Pi 4, by purchasing games on Stadia or subscribing to the service.
Stadia may not have a native client for the Raspberry Pi, but we can still use the Chromium web browser to play games via it.
For these games to function, you will need access to a game controller, either Stadia's native controller or something like an Xbox controller.
To maximize the performance of your Raspberry Pi, we recommend using an Ethernet connection. Wi-Fi connections are likely to add too much lag to the connection and ruin your experience.
Equipment List
You can find a list of the equipment we used to run the Google Stadia service on the Raspberry Pi below.
Recommended:
- Raspberry Pi 2, 3 or 4
- Micro SD Card
- Power Supply
- Ethernet Cable (Recommended) or Wi-Fi
- USB Keyboard
- USB Mouse
- HDMI Cable
Optional:
- Xbox Controller
- Raspberry Pi Case
- PlayStation Controller (PS3, PS4 or PS5 Controller)
Read More: How to Setup a Raspberry Pi: A Beginner’s Guide
Setting Up Your Raspberry Pi to Run Google Stadia
Starting with Raspberry Pi OS Desktop without the recommended applications will allow us to maximize the performance of our Raspberry Pi.
We may start our Raspberry Pi with a much cleaner slate and reduce the hardware burden by not using the recommended software.
Please take note that you must use Raspberry Pi OS since the release of Chromium has extra performance improvements for the Raspberry Pi hardware.
- We should first make sure everything is up-to-date before we run Stadia on the Raspberry Pi.
By running the following two commands, we may update all of the existing packages:
sudo apt update
sudo apt full-upgrade -y- Let's make sure Chromium is installed when our operating system has finished upgrading by running the following command:
To access the Stadia web interface, we will use the Chromium web browser.
sudo apt install chromium-browser -yThe following packages must be installed if you intend to run Stadia on a “lite” version of the Raspberry Pi OS.
sudo apt install xserver-xorg xfce4 xfce4-terminal -yIn the absence of a full desktop interface, these packages will handle window management on your device.
- The next step is to increase the amount of memory specifically designated for the GPU.
For intensive use, the amount of memory allocated to the GPU is way too low.
Running the command below will launch the Raspi configuration tool, allowing us to increase the amount of memory we are providing the GPU.
sudo raspi-config- You must navigate to the “
4 Performance Options” option inside the tool by using the arrow keys.
Press the ENTER key to open the option after it has been chosen.

- You need to use the arrow keys to select the “P2 GPU Memory” option.

- Within this menu, change the number from “
64” to “128.”
If you are using a Raspberry Pi 4 with 8GB of memory, you can get away with setting this to “256.”
Press the ENTER key to save this change.

- Now, you can quit the tool by pressing the ESC key.
If you are asked if you would like to reboot the system, select”<Yes>” option.
Running the following command in the terminal will restart your Raspberry Pi in any case:
sudo rebootYou may move on to running Stadia after your Raspberry Pi has finished restarting.
Read More: How to Turn your Raspberry Pi into a Web Server
Running Google Stadia on the Raspberry Pi
We can now put Stadia to use now that we have prepared the Raspberry Pi. As Stadia can be run via the Chromium web browser, the method is quite straightforward.
Make sure you are using an Ethernet connection to obtain the best experience while running Stadia. The Raspberry Pi's Wi-Fi has been known to significantly increase latency.
To improve Stadia's performance, you might also think about overclocking your Raspberry Pi. Be sure, however, that you keep your device cool and that whatever overclock you use is stable.
- You must start by opening the Chromium web browser on your Raspberry Pi.
You can do this by using the following command within the terminal:
chromium-browserYou may also find the web browser by going through the desktop interface.
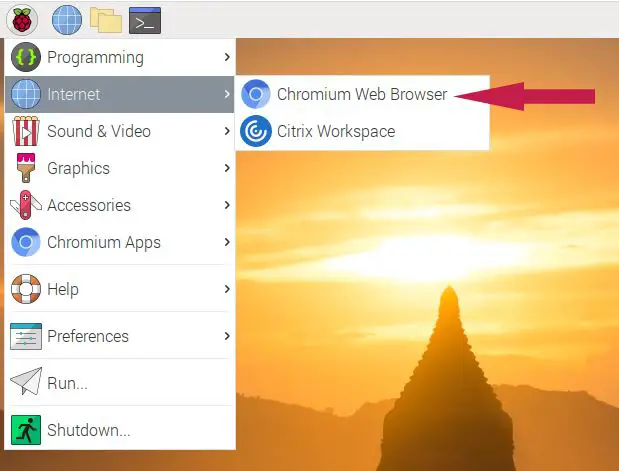
- To find the Chromium web browser on the desktop, click the Raspberry icon in the top-left corner (1.).
Next, you need to hover over the “Internet” option (2.).
Finally, within this menu, you will find the “Chromium Web Browser” option. Once found, click it (3.).

Once you have the Chromium web browser opened, you can go to the following address:
This link will take you directly to the Stadia website.
https://stadia.google.comYou may register a new Stadia account or log in to your current one once you've reached the website.
You will be able to start streaming games from the Stadia service to your Raspberry Pi after you have signed into your account.
Stadia will be able to use the majority of controllers attached to your Raspberry Pi. especially if they are genuine Xbox or PlayStation console ones.
Some games will even let you use the keyboard and mouse that are attached to your Raspberry Pi.
Read More: How to Find a Raspberry Pi’s IP Address in 6 Ways
The Performance of Stadia
Depending on the games you try to run on Stadia on the Raspberry Pi, your experience will undoubtedly differ.
You will get the best experience in games that are less susceptible to latency or potential frame drops. So try to stick to more strategy-based video games whenever you can.
Although Stadia may be limited by the Raspberry Pi's performance, it is still a viable option if you don't have a gaming PC. Check out Parsec or Steam Link if you do have a gaming PC.
Both will provide a better experience on your Raspberry Pi since they may be run locally, reducing potential latency.
Conclusion
You should now have a general notion of how to run Stadia on a Raspberry Pi.
You may play your games anywhere thanks to Google's Stadia game streaming service. The games must be purchased via their service, or a monthly membership fee must be paid.
The Raspberry Pi handles Stadia's video feeds well. That is not, however, the finest experience. You should try to stick with games where latency won't be a problem.


![Official Arduino Starter Kit [K000007] (English Projects Book) - 12 DIY Projects with All Necessary Electronic Components and Instructions - origianl kit by Arduino from Italy](https://m.media-amazon.com/images/I/51fPv6DsjQL.jpg)


